

Tools & technique
Stencil paper explained for beginners: the best thermal papers
What each layer does, which paper fits your printer, and how to avoid faint or blurred transfers. Our buying shortlist covers Spirit, Electrum, Phomemo and S8.
What tattoo stencil paper actually does
Tattoo stencil paper carries a temporary guide from your drawing to the surface you are working on. In a thermal setup, heat transfers the design from a coated layer onto the stencil sheet. A compatible transfer product then helps place that image on skin. The stencil is a guide for the design, not the tattoo itself.
For a first purchase, our general pick is Spirit Classic Thermal in a size your stencil printer supports. If you own a Phomemo M08F Tattoo, its specified paper is also a sensible starting point. The important purchase is a known paper-and-printer combination you can learn to load correctly.
This guide uses manufacturer instructions and product listings checked September 27, 2026. The recommendations are our editorial shortlist. We have not run a controlled comparison of line sharpness or how long these papers hold on skin.
The four layers, from top to bottom
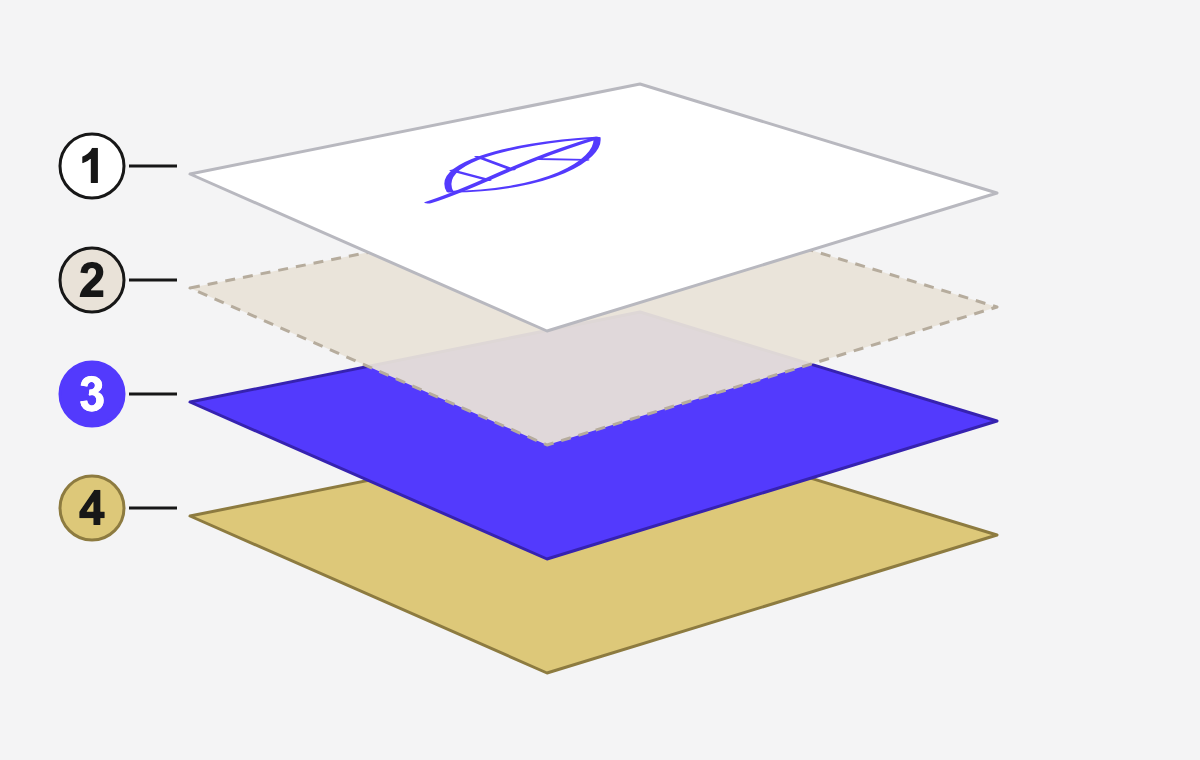
A common thermal stencil set has four layers. Phomemo's illustrated guide shows the familiar white, tissue, purple and yellow arrangement:
- The white master sheet receives the design. This is the sheet you keep after printing and use for the transfer.
- The thin protective tissue separates the master from the coated layer during storage. Remove it before making the stencil.
- The colored transfer layer supplies the marks. Purple is common, but other stencil colors exist.
- The backing sheet supports the set. It is often yellow. Whether it stays attached for printing depends on the equipment.
That last distinction matters. The M08F Tattoo instructions say to remove both the protective sheet and the yellow backing before loading. S8's instructions make backing removal dependent on the imaging method. Check your printer's loading diagram before pulling the whole set apart.
Thermal, freehand and ordinary printer paper
Buy paper labeled for tattoo stencils and for the process you use. The word thermal by itself also appears on receipt and document paper. Those products are not substitutes for tattoo transfer sheets.
Thermal stencil paper
This is the category for a compatible tattoo stencil printer or thermal copier. Some products also accept hand tracing. S8, for example, explicitly lists both thermal and impact use for its red paper. Check the individual product instead of assuming all sheets behave the same way.
Freehand or hectograph paper
This is intended for drawing or tracing with pressure. Spirit Classic Freehand is sold for manual stencil work. Spirit's paper guide distinguishes its impact sets from its thermal sets. Choose the thermal version when buying for a printer.
Inkjet stencil systems
These use a different combination of printer, stencil ink and paper. Follow that system's supply list. Feeding a four-layer thermal set into an ordinary office printer is not the same process. The distinction is covered in Electrum's printer setup guide.
If you are still choosing a method, our guide to freehand, thermal and inkjet stencil paper compares the supplies each setup needs before you buy.
The best thermal stencil papers for different jobs
We would narrow the choice to the papers below. The buying reasons concern format, color, compatibility and pack size. They are not lab scores or a claim that one paper produces the best result in every studio.
| Paper | Why consider it | Listed pack and price |
|---|---|---|
| Spirit Classic Thermal 11-inch | Our general starting choice for a supported thermal setup | 100 units, $42.00 |
| Spirit Green Thermal 11-inch | A different stencil color when purple is hard to read | 100 units, $44.00 |
| Electrum Gold Standard | A 100-sheet alternative to compare in the same printer | 100 sheets, 8.5 × 11 inches, $39.99 |
| Phomemo tattoo paper | Listed for M08F Tattoo, TP81, TP83 and TP87 | 100 A4 sheets, $28.99 sale price |
| S8 Red Stencil Paper | Red guides for separating the stencil from black linework | 100-count listing sold out direct when checked |
Prices and stock can change. Use the linked listing to confirm the exact variant before ordering, especially when a page offers several pack sizes.
Spirit Classic Thermal: our first-box recommendation
Spirit publishes instructions for its paper and offers several formats. Its small-count Classic Thermal packs contain 25 or 50 units, so you can learn the workflow without buying a full box. We would start with a smaller pack, confirm the feed and transfer, then buy more of the same paper.
Spirit Green: an option when contrast is the problem
Spirit specifically markets its green dye for visibility on darker skin tones. That makes it worth considering when a purple stencil is difficult to distinguish. Check the transferred marks under your working light. Color choice does not fix an incomplete or blurred stencil.
Electrum Gold Standard: a standard sheet-format alternative
Electrum lists 100 sheets at 8.5 × 11 inches. We would compare it with Classic using the same file and printer settings before buying in quantity. At the listed prices above, the difference is only about two cents per sheet. One avoidable reprint can matter more than that price gap.
Phomemo: a clear starting point for the listed models
The linked pack names M08F Tattoo, TP81, TP83 and TP87 compatibility and specifies A4 dimensions. That gives a new owner a concrete supply to match to the machine. Phomemo also sells other paper products, so check the complete product name rather than ordering by brand alone.
S8 Red: a color alternative, subject to availability
S8 describes red as providing separation from black lining on lighter skin tones. Its paper supports thermal and hand-drawn imaging. The direct 100-count listing was sold out during this review, so confirm availability with a supplier before planning around it. We would treat it as a color option to assess, not an essential first purchase.
Check sheet size before comparing prices
A4 and U.S. Letter are different sizes. A4 is 210 × 297 mm. Letter is 8.5 × 11 inches, or 215.9 × 279.4 mm. A paper listing that loosely uses both names deserves a closer look at the stated dimensions.
Match the width, length and feed requirements to your printer. Also check its printable area. A sheet fitting into the slot does not mean a design can reach every edge.
For larger work, Spirit sells Classic Thermal in a 100-foot roll that can be cut to length. Its instructions call for an extra-long carrier when using the roll in thermal machines. Confirm your machine's own requirements and supported length before buying a roll or a long sheet.
Compare total delivered cost per usable sheet. Count failed feeds and reprints separately while you learn. A smaller pack can cost more per sheet and still be the less expensive way to find out whether a paper suits your setup.
Load and print a first stencil
Begin with a simple design containing a curve, a few straight lines and some open space. Keep that same file for later checks so a changed result is easier to trace to paper or settings.
- Check that the printer supports the paper's type and dimensions.
- Remove the protective tissue. Keep the master and transfer layers aligned.
- Follow the model's instructions for the backing, feed direction and any carrier. On the M08F Tattoo, Phomemo specifies white side up and purple carbon side down after removing the backing.
- Set the intended print size and check the orientation. Confirm whether the app or printer already mirrors the design.
- Print once at the manufacturer's recommended starting setting, then inspect the stencil sheet before attempting a transfer.
The model-specific example comes from Phomemo's M08F Tattoo instructions. A traditional copier with a separate feed for the original drawing can require a different arrangement. A carrier is an additional sleeve used by some machines, not another name for the yellow backing.
A sharp print still needs a careful transfer
Use practice skin while learning the handling sequence. For client work, skin preparation belongs within your studio's hygiene training and the instructions for the products you use.
Spirit's application instructions call for a thin layer of compatible transfer agent. Place the image side against the prepared surface, hold without sliding, lift the paper carefully and let the transfer set before wiping. Sliding the sheet after contact can produce doubled or blurred lines.
Follow the transfer product's timing. There is no single drying time that this article can assign to every cream, gel and working condition.
Use a fresh stencil for each person. Suffolk's infection-control guidance specifies single-use stencils for marking skin. A coated tracing sheet advertised for repeated drawing use is different from a stencil sheet that has already touched a client.
Why a stencil comes out faint, patchy or blurred
The sheet comes out blank
Check the paper type, protective tissue and feed orientation before raising the heat. Confirm which face is supposed to meet the print head. Loading errors are a better first check than assuming the entire pack is defective.
The printed lines are too faint
Check the source image and the printer's darkness setting, then inspect the paper's condition. Electrum's troubleshooting guide identifies retained tissue, heat settings and old or humidity-exposed paper as possible causes. Change one setting and print the same test design again.
The print is dark but the skin transfer is fuzzy
Compare the stencil sheet with the transferred image. If the sheet is sharp, investigate the transfer stage: product amount, timing and movement. Running the same design through the printer at a darker setting will not correct a sheet that slid during application.
Fine gaps disappear
Inspect the artwork at the actual tattoo size. If two marks already meet in the file, a different paper cannot separate them. If the file is clear but the printed sheet merges them, compare another supported print setting before changing several parts of the setup.
The design is the wrong size or backwards
Check scaling in the file, print app and driver. Measure the printed design. When using a mirrored export, check that the printer does not mirror it a second time. A small orientation test with an unmistakable left and right side can save a full sheet.
Prepare the file before spending another sheet
A paper change cannot decide which contours belong in a stencil. Remove marks you do not need, inspect lettering and faces against the reference, and settle the intended size before printing.
In StencilMaker AI, you can convert a reference, correct the lines, set physical dimensions and export PNG, PDF or JPEG. The printer's app or driver handles the hardware connection. For our PDFs, print at actual size or 100% with fit-to-page disabled, then measure the result.
Changing the on-screen ink color does not change the dye in thermal stencil paper. A purple or green transfer comes from the paper you load. If you already have clean linework in a drawing app, our StencilMaker AI versus Procreate comparison explains when exporting that existing layer is enough.
What we would buy first
Start with a small pack of Spirit Classic Thermal if your printer supports it, or the specified Phomemo paper for one of the listed models. Add a compatible transfer product and keep the printer's loading instructions nearby.
Choose Spirit Green when you need to assess a different stencil color. Consider Electrum when comparing another standard sheet-format supply, and S8 Red when red guides suit the work and stock is available.
Get one combination working before filling a drawer with alternatives. A repeatable print and a readable transfer give you a useful baseline for judging the next paper.
Frequently asked questions
What is the best tattoo stencil paper for beginners?
Our general starting recommendation is a small pack of Spirit Classic Thermal in a size your printer supports. For an M08F Tattoo, TP81, TP83 or TP87, Phomemo's listed paper is another clear starting option. These are buying recommendations based on product specifications, not a controlled performance ranking.
Which layer of stencil paper do I remove?
Remove the protective tissue before making the stencil. Whether to remove the yellow backing depends on the printer. Phomemo's M08F Tattoo instructions require its removal. Follow your model's loading diagram.
Can I use tattoo stencil paper without a printer?
Yes. Freehand or impact paper is made for tracing with pressure. Some thermal papers also support hand drawing, including S8 Red. Check the product instructions before choosing a method.
Can I put thermal stencil paper in a normal printer?
Do not assume it is compatible. A four-layer thermal stencil set belongs in a supported stencil printer or copier. Inkjet stencil systems require their own specified printer, ink and paper combination.
Is green stencil paper better than purple?
It depends on visibility in the working conditions. Spirit markets Green for greater visibility on darker skin tones. Compare the actual transfer under your working light. Color alone does not establish better detail or longer hold.
Can I reuse a stencil that has touched skin?
Use a fresh stencil for each person. Reusable coated sheets for tracing are a different product from a stencil sheet that has already contacted a client.
Will changing my design to green make a thermal stencil green?
No. In a thermal stencil workflow, the transfer color comes from the paper's dye. Changing the artwork's display color does not replace the coating in the paper.
Sources
- Spirit: Classic Thermal 11-inch
Manufacturer listing, purple dye, 100-unit pack and $42.00 price. Checked September 27, 2026.
- Spirit: small-count Classic Thermal
25- and 50-unit packs for smaller initial purchases.
- Spirit: Green Thermal 11-inch
Manufacturer's contrast claim, 100-unit pack and $44.00 price. Checked September 27, 2026.
- Spirit: Classic Freehand
Paper intended for drawing stencils by hand.
- Spirit: Create a Stencil
Thermal versus impact sets, protective tissue and transfer application instructions.
- Spirit: Classic Thermal Roll
100-foot roll and the manufacturer's carrier instructions.
- S8: Red Stencil Paper, 100 count
Color, thermal/impact use and backing instructions. Direct listing sold out when checked September 27, 2026.
- Electrum: Gold Standard Thermal Transfer Paper
100-sheet, 8.5 × 11-inch pack. Opened product page listed $39.99 on September 27, 2026.
- Electrum: thermal printer setup guide
Printer/paper selection and troubleshooting. Manufacturer guidance, not independent comparative testing.
- Phomemo: M08F, TP81, TP83 and TP87 transfer paper
100 A4 sheets, named compatible models and $28.99 sale price. Checked September 27, 2026.
- Phomemo: M08F Tattoo printer instructions
Removal of protective tissue and yellow backing, plus feed orientation for this model.
- Phomemo: beginner stencil-printer guide
Illustration identifying the four layers in a common thermal stencil set.
- Suffolk: skin piercing infection-control guidance (PDF)
Public health guidance specifying single-use stencils. Follow the requirements that apply to your studio.